Pressure injury stages: What they are and why they matter
How to accurately assess wounds to improve clinical and financial outcomes.

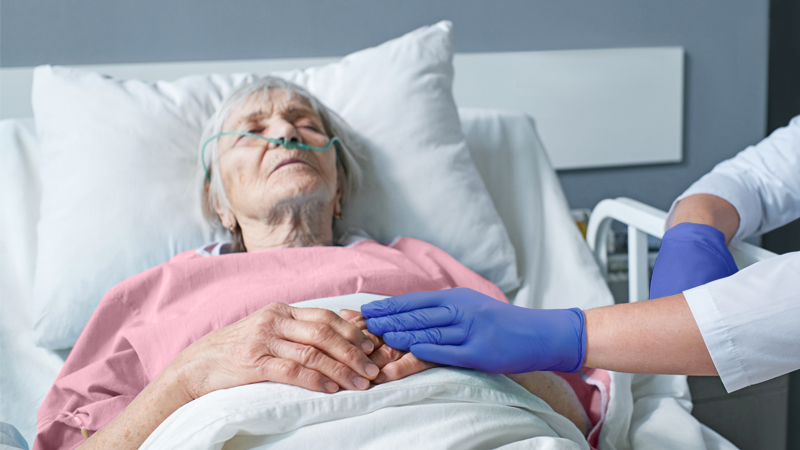
While you and your team work hard to care for fragile skin, preventing and treating pressure injuries is a complex issue. One of the first steps to helping better manage pressure injuries and reduce their occurrence is through accurate pressure injury staging.
Topics covered:
STAGES | EDUCATION | CAUSES | PREVENTION
Pressure injury stages
Not all pressure injuries are created equal. They’re classified into six stages based on the severity of the injury. Correct staging helps guide treatment plans and improve clinical and financial outcomes. That’s why it’s important for caregivers to understand and recognize the characteristics of each stage. Here, we break down each stage.
Stage 1: Non-blanchable erythema (redness) of intact skin
Characteristics include: Intact skin with a localized area of skin that does not turn white when pressed (non-blanchable erythema), possible changes in sensation, temperature or firmness that precede non-blanchable response.
Remember: Dark skin tones rarely show a blanchable response, so other qualities should be taken into account, such as taut, shiny or hardened skin.
Good to know: If color changes include purple or maroon discoloration, these may indicate a deep tissue pressure injury.

Stage 2: Partial-thickness loss of skin with exposed dermis
Characteristics include: Wound bed is viable, pink or red, moist, and may also present as an intact or ruptured serum-filled blister. The injury is through the epidermis and some of the dermis, which means it’s a fairly shallow, but open wound.
Remember: What you don’t see at this stage is important too, and that includes adipose (fat), deeper tissues, granulation tissue, slough and eschar.
Good to know: These injuries commonly result from adverse microclimate and shear at the pelvis and shear in the heel.

Sometimes Stage 2 pressure injuries can be confused with incontinence associated dermatitis, so be sure to know the difference.

Stage 3: Full-thickness skin loss
Characteristics include: Full-thickness loss of skin, in which fatty tissue is visible in the wound, and granulation tissue and epibole (rolled wound edges) are often present. Slough and/or eschar may also be visible. Undermining and tunneling may occur. Fascia, muscle, tendon, ligament, cartilage and/or bone are not exposed.
Remember: The depth of tissue damage varies depending on where on the body the wound is.
Good to know: If slough or eschar obscures the extent of tissue loss, this is an Unstageable Pressure Injury.

Stage 4: Full-thickness skin and tissue loss
Characteristics include: Full-thickness skin and tissue loss with exposed or directly palpable fascia, muscle, tendon, ligament, cartilage or bone. Slough and/or eschar may be visible. Epibole (rolled edges), undermining and/or tunneling often occur.
Remember: Depth varies depending on injury location
Good to know: Like a stage 3, if slough or eschar obscures the extent of tissue loss, this is an Unstageable Pressure Injury.

Unstageable: Obscured full-thickness skin and tissue loss
When slough or eschar gets in the way of seeing the extent of tissue damage within full-thickness skin and tissue loss, then the injury is unstageable. Caregivers may only be able to see a layer of dead tissue that’s yellow, grey, green, black or brown. Removing slough or eschar will likely reveal a stage 3 or stage 4 pressure injury. In some cases, stable eschar should not be softened or removed, such as on the heel or ischemic limb.

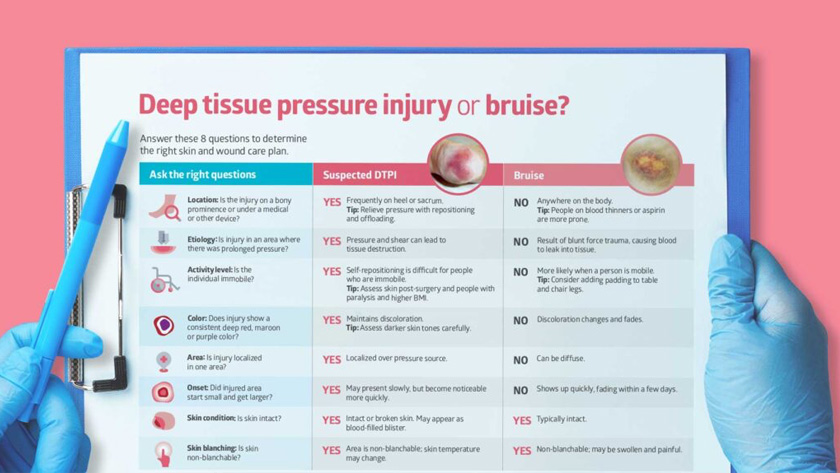
Deep Tissue: Persistent non-blanchable deep red, maroon or purple discoloration
When caregivers see intact or broken skin that’s non-blanchable and discolored with localized dark red, maroon or purple, or there’s a blood-filled blister, it may indicate that there’s damage of underlying soft tissue. Look for these after long surgical procedures. It’s important to remember that discoloration can appear differently in dark skin tones, so pay attention to pain and temperature changes as well.

Also be aware that a DTPI can be misclassified as a bruise. Help caregivers know the difference.

Can a pressure injury stage change up or down?
After DTPIs evolve, or unstageable pressure injuries are debrided, these injuries can be numerically staged. However, it’s important to note that the numerical pressure injury staging system doesn’t mean that injuries necessarily progress in a linear fashion, from stage 1 through 4. And they don’t heal in a reverse trajectory. In fact, NPIAP discourages caregivers from “down-staging” skin breakdown.
NPIAP discourages caregivers from “down-staging” skin breakdown.
To avoid confusion, some NPIAP international partners, such as the European Pressure Ulcer Advisory Panel, have replaced the term “stage” with “grade” or “category.” The United States has chosen to stick with “stage,” and education on the term should include the explanation that each stage is independent.
Staging education for caregiving staff
With healthcare organizations focused on reducing healthcare-associated pressure injuries (HAPIs), there’s more attention on correct pressure injury staging—and for good reason, notes Medline Director of Clinical Resources Patricia Turner, BSN, RN, CWOCN, CWS. “Ramifications of getting it wrong are financial, clinical and affect patient satisfaction.” However, pressure injury staging can be challenging.
“Unless you’re staging all the time, it’s hard to know the nuances,” Turner says. If caregivers can’t stage the wound accurately, the question becomes, “How are they going to know what treatment protocol or guidelines to follow?”
The six pressure injury stages have been compared to the condition of a piece of fruit. Medline clinician Patricia Turner, BSN, RN, CWOCN, CWS developed the patented Apple P.I.E. (Pressure Injury Explanation) tool using the changes of an apple to help caregivers learn and understand the stages of pressure injuries.
“Facilities know their staff still struggles with the importance of getting that staging accurate.”

Patricia Turner
Medline clinician, BSN, RN, CWOCN, CWS
“Facilities know their staff still struggles with the importance of getting that staging accurate,” Turner says. “So, it’s very common that we get asked to present on pressure injuries and staging.” Here’s what the apple comparison looks like:

Stage 1 is equated with the bright red color of an apple because the skin is intact, but non-blanchable, so the redness won’t go away simply by touching the skin.
Stage 2 looks like a peeled apple, as this pressure injury is superficial, a shallow open injury.
Stage 3 resembles an apple with a big bite out of it because this is a full-thickness injury, with all layers of the skin missing.
Stage 4 apples are bitten all the way to the core, demonstrating that this full-thickness wound involves the underlying structure of the skin.
Unstageable PI is compared to a caramel-covered apple because it is so fully covered with eschar or slough that the depth of the wound is obstructed.
Deep Tissue Pressure Injury would be like an apple with a purple or dark spot on the skin that signals potential browning underneath. In terms of the wound, it would indicate tissue damage beneath seemingly intact skin.
At its core, the Apple P.I.E. tool helps with staging
Patricia Turner found a way to help make pressure injury staging education easy by creating the patented Apple P.I.E. tool, comparing pressure injury stages to a apple with a simple, visual and relatable analogy. “If you research adult learning, you’ll see it’s very much about being visual and repetitive, and the ability to equate what you’re trying to learn with something you’re familiar with,” Turner explains.
As interest grew in this staging tool, Turner collaborated with nurses at several facilities to build a workshop that would add a hands-on component. At these events, nurses are given several apples and a patient scenario or wound description. Then the educator asks participants to prepare their apples to match the description. “While anyone can stand in front of a group of nurses and read the National Pressure Injury Advisory Panel definitions,” Turner says, “the Apple P.I.E. tool is fun and creative, so you’ll really remember that moment when you had to bite the apple to get to the core. It might be corny, but you’re going to remember it, and it’s going to make sense to you.”
At a hospital in Pennsylvania whose nurses had never seen the Apple P.I.E. tool previously, they soon realized its value. Turner did a short pre-test about pressure injury staging with about 80 nurses and says, “Most didn’t do well.” Then she presented the Apple P.I.E. concept, and followed up with another set of staging questions. “Absolutely, without a doubt, the staff was much better able to stage accurately,” she confirms, “from about an average success rate of 34 percent to 88 percent.”
Pressure injury staging education has direct impact on caregiver knowledge, which helps standardize best practice, ultimately improving skin health outcomes.”
What causes pressure injuries?
Pressure injuries, also known as pressure ulcers, pressure sores, bedsores or decubitus ulcers, occur when an area of skin and underlying tissue becomes damaged. NPIAP explains: “Ulcers are usually part of a larger pathological process (e.g., venous ulcers, diabetic foot ulcers).” Typically the tissue damage is due to four key contributing factors: prolonged pressure, friction, shear and excessive moisture. It might be one of these or a combination.
Pressure injuries most commonly develop due to pressure, often occurring when a person is immobile. Higher risk areas include bony prominences like heels, hips and tailbone, which all have less fatty tissue. The pressure can reduce blood flow, ultimately killing cells and leading to skin damage.

Pressure injuries, also known as pressure ulcers, pressure sores, bedsores or decubitus ulcers, occur when an area of skin and underlying tissue becomes damaged.
Friction occurs when skin is dragged across a surface, such as when a patient is moving in their bed. The outer layer of the skin gets damaged, leading to breakdown and open wounds. Shear often happens at the same time, when one part of the body is pushed down, and another part is pushed side to side.
Too much moisture on the skin can also contribute to the development of pressure injuries, as it can lead to maceration and softening of the skin, making it more susceptible to damage.
Pressure injuries can also develop because of long periods wearing a medical device such as oxygen tubing, facial masks and splints. Research has shown that the risk factors for developing a medical device-related pressure injury are about the same as for any pressure injury. In other words, just as every patient is considered at risk for a pressure injury, every patient with a medical device is at risk for an MDRPI.
People most at risk for pressure injuries:
- Immobile for any reason
- Using a wheelchair
- Wearing a cast, splint or prosthetic device
- Incontinent
- Older individuals
- Sensory impaired individuals
- People with a history of a previous PI
Underlying health conditions that affect pressure injury formation:
- Cancer
- Peripheral artery or venous disease
- Dementia
- Diabetes
- Heart failure
- Malnutrition
- Spinal cord injury or spina bifida
Where do pressure injuries occur?
The National Pressure Injury Advisory Panel (NPIAP) defines a pressure injury as, “localized damage to the skin and underlying soft tissue usually over a bony prominence or related to a medical or other device. The injury can present as intact skin or an open ulcer and may be painful.”
NPIAP was originally called the National Pressure Ulcer Advisory Panel, but was renamed to make it clear that pressure injuries are also found on intact skin, not only ulcerated skin. NPIAP explains the distinction: “Ulcers are usually part of a larger pathological process (e.g., venous ulcers, diabetic foot ulcers).”
The area of the body most commonly affected by pressure injuries is the sacrum, accounting for as much as 44%.3
The area of the body most commonly affected by pressure injuries is the sacrum, accounting for as much as 44%. The buttocks and heel tie for second at 15% each.3 But with patients who are put in a proning position, it’s important to pay attention to the forehead, nose, chin, thorax, pelvis, knees and feet as well.
Pressure injury prevention strategies
After the skin assessment has revealed a person’s risk, there are important steps to take to help prevent skin breakdown. Follow these best practices to help fight the factors that contribute to pressure injuries.
Reduce pressure by positioning patients at the NPIAP-recommended 30-degree angle with wedges that are easy to use and comfortable for patients.
Offload heels with heel offloading devices that help also stabilize the lower leg. Studies show that adding prophylactic dressing at the heels can also help.
Absorb shear force with a five-layer foam dressing that’s been shown in studies to disperse pressure.
Safely and gently redistribute pressure using a repositioning sheet while moving or transferring from one surface to another.
Choose support surfaces that help manage tissue loads and microclimate, prevent tissue deformation and improve tissue perfusion through the effective use of pressure-reducing components such as air, gel, water and foam.4
Clean and hydrate skin with the right system of skin care products. Cleanse skin promptly with a pH-balanced cleanser after each incontinence episode.
Keep skin dry with a dry pad to manage moisture and a five-layer silicone dressing to help wick away excess fluid.
Pressure injury risk assessments
Specific pressure injury risk assessments are also essential to optimal skin health. The two most common risk assessment tools are the Norton Scale and Braden Scale. Both of these systems are made up of subscales with numbered scores. The ratings are tallied to come up with a risk level total score, which helps determine treatment or prevention plans. The lower the number, the higher the risk.
However, no matter which scale your organization chooses to use, it’s important to educate caregivers to look beyond the total score and consider two other issues:

- Each subscale score. They measure distinct factors that can each contribute to pressure injury development on their own. So even if the total score seems to say the person is only at low or moderate risk, if one subscore is low, specific prevention interventions should be implemented.
- Clinical judgment. Caregivers can include their own experience to help determine pressure injury risk. It’s also helpful to listen to patients and review patient history. Is the patient a smoker? Have they had pressure injuries in the past? These could reveal other risks outside of the numbers on the scale.
Key takeaway
Pressure injuries are an ongoing challenge in both acute and non-acute settings. Accurate pressure injury staging is an essential step to help care for these challenging wounds and reduce wound costs. When caregivers are educated on how to properly assess and stage wounds, they feel empowered to provide the right tools and strategies to improve skin outcomes.